

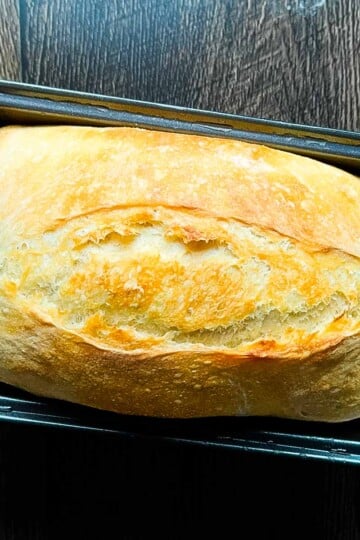
This easy, no-knead sourdough bread creates a perfect artisan loaf in just one day with minutes of hands-on time! You'll get that gorgeous golden crust with a soft, chewy interior and classic sourdough tang. The dough practically makes itself!
Like my homemade dinner rolls and Irish soda bread, this recipe shows you don't have to be an experienced baker to make bread from scratch!

Want to save this recipe?
Enter your email & I'll send it to your inbox. Plus, get great new recipes from me every week!
Remember the first time you walked into a bakery and smelled that intoxicating aroma of freshly baked sourdough? That perfect combination of crispy crust and tender inside that makes you want to spend $8 on a single loaf?
Well, prepare to create homemade sourdough bread in your kitchen - without the hefty price tag!
First off, I want to say that you don't need to go out and buy a whole bunch of special equipment. You can if you want, but you don't need to. And making sourdough is not complicated. It is by far the easiest bread I have ever made.
You'll be shocked at how four simple ingredients can give you the most amazing bread. Don't overthink it, just do it.
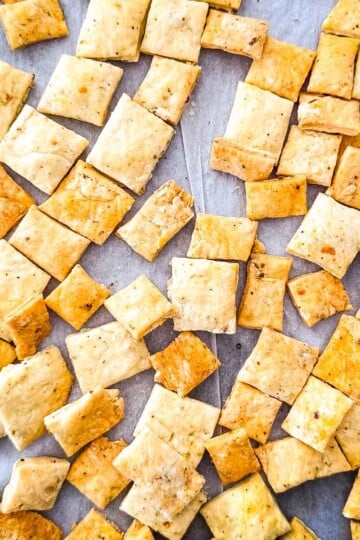
This bread is perfect for making sourdough French toast, a smoked grilled cheese sandwich or air fryer Reuben sandwich, and serving with vegetable pot pie, marry me chicken soup, and roasted butternut squash soup.
Jump to:
- Easy No Knead Sourdough Bread
- Understanding Sourdough
- Baking Schedule
- Recipe Ingredients
- Essential Equipment
- Step-by-Step Instructions for Perfect No-Knead Sourdough
- The Hardest Part: Cooling (2+ hours)
- Top Tips for Perfect Sourdough
- Storing Your Sourdough
- Recipe FAQs
- More Bread Recipes to Try
- Printable Recipe
- Comments
Easy No Knead Sourdough Bread
While other sourdough recipes have you kneading and folding all day long, this one lets time do most of the work. Your hands-on time? Just minutes! The result is a gorgeous artisan loaf with:
- A crackly, golden-brown crust that shatters perfectly when sliced
- A tender, chewy inside with beautiful air pockets
- That complex, tangy flavor that only wild yeast fermentation can deliver
- A texture that makes store-bought bread seem like a distant memory
Once you make this recipe, make my No Knead Jalapeño Cheddar Sourdough Bread and No Knead Sourdough Sandwich Bread next!
Understanding Sourdough
Unlike bread made with commercial yeast, sourdough relies on wild yeasts and beneficial bacteria for natural fermentation. This process:
- Creates complex flavors impossible to achieve with quick-rise methods.
- Makes the bread easier to digest (my husband notices the difference!)
- Saves you money - make bakery-quality bread for pennies at home.
Baking Schedule
This is the timeline I use. You can adjust the times to work best for you! You can also bake it at night and let it cool overnight for breakfast the next morning.
Classic Schedule
Evening Before:
- 9:00 PM: Feed starter (25g starter + 75g flour + 75g water)
- Let rest overnight at room temperature
Next Day:
- 7:00 AM: Mix dough (starter should be bubbly and doubled)
- 7:05 AM: Cover dough, place in oven with light on
- 1:00 PM: First rise complete, shape loaf
- 3:30 PM: Begin baking
- 4:15 PM: Cooling begins
- 6:15 PM: Ready for dinner!

Recipe Ingredients
- Active Sourdough Starter: The heart of your bread, providing natural leavening and that signature tangy flavor. You can make Homemade Sourdough Starter, which takes a couple of weeks, or order sourdough starter from Amazon.
- Bread Flour: Higher protein content creates better structure (all-purpose flour works too).
- Filtered Water: Clean-tasting water at 90°F helps activate the starter.
- Sea Salt: Enhances flavor and controls fermentation. (If you ever want to see what happens if you forget the salt let me know - I took a picture).
See the recipe card below for full information on ingredients and quantities.
Essential Equipment
- Dutch Oven: Creates steam for the perfect crust.
- Proofing Basket (Banneton): Helps maintain the loaf's shape during proofing. Don't worry if you don't have one; a large bowl lined with a well-floured kitchen towel works perfectly!
- Parchment Paper: Makes transferring the dough easy.
- Sharp Knife, Bread Lame: For scoring the top of your loaf. (The bread lame is a razor blade with a handle - be careful!)
Step-by-Step Instructions for Perfect No-Knead Sourdough
Evening Before: Build Your Starter (5 minutes + 8-12 hours rest)
This step develops a strong, active starter to give your bread amazing lift and flavor. Think of it as feeding your tiny yeast helpers!
In a clean jar, combine:
- 25g mature starter
- 75g unbleached bread flour
- 75g filtered water (90°F)
Mix with a spoon until no dry flour remains. The mixture should feel like thick pancake batter. Cover loosely with plastic wrap and rest overnight at room temperature (65-75°F).
Success Check: By morning, your starter should be:
- Doubled in size
- Full of bubbles throughout
- Smell pleasantly sour
- Pass the float test (a small amount of unstirred starter should float in water).

Next Morning: Make the Dough (10 minutes + 5-6 hours fermentation)
Combine 100g ripe sourdough starter with 300g warm water (90°F) in a large mixing bowl. (Use the leftover sourdough starter to make another batch of bread, and store any extra starter (sourdough discard) in a jar in the fridge for up to 2 weeks. Use the discard to make Sourdough Chocolate Chip Cookies, Sourdough Discard Banana Bread, Sourdough Discard Pancakes, and Sourdough Discard Waffles).
Stir with a spoon until the starter is fully dispersed in the water. Add 500g bread flour and 10g sea salt. Mix until a shaggy dough forms, then use your hands to form it into a sticky ball.
Note: The dough will be quite sticky - this is normal and helps create that perfect artisan texture.

First Rise (5-6 hours)
During this time, natural fermentation works its magic, developing flavor and structure:
Cover your bowl with plastic wrap. Place in a warm spot (your oven with just the light on works great!). Let it rest for 5-6 hours until noticeably puffy and doubled in size.
Oven Light Tip: Oven lights vary by brand and wattage. With the light on, the oven should feel barely warm (around 80-85°F). If your bowl feels warm to the touch, crack the oven door or turn the light off after the first hour to prevent over-fermentation.


Shaping Your Loaf (10 minutes)
Proper shaping creates surface tension that helps your loaf rise up instead of out. (Watch the video below on how to do this).
- Dust your counter lightly with flour.
- Gently turn your dough out, smooth side down.
- Shape into a rough rectangle.
- Pull and stretch the dough:
- Top third down to center
- Bottom third up over that
- Left side to center
- Right side to center
- Pinch everything together.
- Flip seam-side down.
- Using cupped hands, rotate and pull the dough toward you. Rotate 90 degrees and repeat until you have a tight, smooth ball.
- Place seam-side up in your floured proofing basket. Dust lightly with flour to prevent the plastic wrap from sticking. Cover loosely with plastic wrap.
Note: If the dough sticks to your hands, dust them lightly with flour. You want the dough tacky but manageable.

Second Rise (2-3 hours)
This final rise prepares your bread for baking. The dough should:
- Nearly double in size
- Feel puffy when gently poked
- Hold an indent from your finger
Return your covered dough to the oven (light on) for about 2-3 hours.


Baking Your Bread (45-50 minutes)
- Remove the dough from the oven.
- Preheat your oven to 450°F.
- Place a piece of parchment paper on the counter and turn dough onto it (seam down).
- Score the top ½-inch deep with a sharp knife or bread lame.
- Using the parchment corners, carefully lower the dough into your Dutch oven.
- Cover with a lid and REDUCE the oven temperature to 425°F.
- Bake covered for 40 minutes.
- Remove the lid and bake for 5-10 minutes more until golden brown.
- Remove from the oven, lift the bread using corners of the parchment paper, and place on a cooling rack.
Note: The internal temperature should be between 190°F and 205°F.

The Hardest Part: Cooling (2+ hours)
I know it's tempting to slice into that beautiful, warm loaf! But waiting ensures:
- The crumb sets properly
- Moisture distributes evenly
- Flavors develop fully

Top Tips for Perfect Sourdough
- Use Active, Bubbly Starter: Test by dropping a small amount in water - it should float.
- Control Your Temperatures: Keep water at 90°F; use oven light for warmth while rising.
- Master the Scoring: Make confident, ½-inch deep cuts. Hesitant scoring leads to uneven expansion. Start with a simple straight line if you're new to scoring.
- Practice Patience: Wait for the bread to completely cool before slicing.
- Use Weight Measurements: A kitchen scale will give consistent results, especially for flour and starter measurements.
- Handle Gently. During shaping, be firm enough to create surface tension but gentle enough to preserve air bubbles.
Storing Your Sourdough
Store your bread at room temperature in a paper bag for up to 3 days. For longer storage, slice and freeze in an airtight container for up to 3 months.

Recipe FAQs
Yes! While bread flour gives better structure, all-purpose flour works well too.
Make sure your starter is active and bubbly before using. Test by dropping a small amount in water - it should float.
Printable Recipe

Easiest Ever Sourdough Bread - No Knead
Equipment
- Dutch oven (5-7 quart)
- Large mixing bowl
- Bread basket or banneton
- Parchment paper
- Sharp knife or bread lame
- Kitchen scale
Ingredients
Starter Build (Night Before)
- 25 grams mature starter (about 2 tablespoons)
- 75 grams unbleached bread flour (or all-purpose flour) (½ cup + 1 teaspoon)
- 75 grams water 90℉ (⅓ cup)
For the Dough
- 100 grams ripe starter (heaping ⅓ cup)
- 300 grams filtered water 90℉ (1¼ cups + 1 tablespoon)
- 500 grams white bread flour or unbleached all-purpose flour (3½ cups + ½ teaspoon)
- 10 grams sea salt (2⅛ teaspoons)
Instructions
- The evening before, combine 25g starter with 75g flour and 75g warm water (90°F) in a clean mason jar. Mix well until no dry flour remains. Cover loosely with plastic wrap and let rest at room temperature for 8-12 hours. By morning, your starter should be doubled in size and full of bubbles.
- The next morning, combine 100g ripe starter with 300g warm water in a large mixing bowl. Stir with a spoon until the starter is fully dispersed. Add 500g bread flour and 10g sea salt. Mix until a shaggy dough forms, then use your hands to form into a sticky ball. The dough will be sticky and rough-looking - this is perfect!
- Cover the bowl with plastic wrap and place in the oven with only the light on. Let rise for 5-6 hours until noticeably puffy and doubled in size. When gently poked, your finger should leave an indent that slowly fills back in. Oven Light Tip: Oven lights vary by brand and wattage. With the light on, the oven should feel barely warm (around 80-85°F). If your bowl feels warm to the touch, crack the oven door or turn the light off after the first hour to prevent over-fermentation.
- Dust your counter lightly with flour. Turn the dough onto the counter, smooth side down. Starting with the top edge, gently pull the dough away, then fold to center. Repeat with bottom edge, left side, and right side. Pinch to seal, then repeat the folds once more. Flip seam-side down and use cupped hands to rotate and pull dough until you have a tight, smooth ball. The surface should feel taut but still soft and pillowy. (Watch the video below on how to do this).
- Dust a bread basket well with flour. Place dough seam-side up in the basket. Dust lightly with flour to prevent sticking, then cover with plastic wrap. Return to the oven with the light on for 2-3 hours until doubled. When gently pressed, the dough should feel light and airy, holding the indentation from your finger.
- Remove the dough from the oven and preheat the oven to 450°F. Note: The Dutch oven does not get preheated for this recipe. Place a sheet of parchment paper on the counter and gently turn the dough onto it (seam side down). Score the top ½-inch deep lengthwise with a sharp knife or bread lame. Your cut should be decisive and deep enough to see the pale dough beneath.
- Using the parchment corners, lift the dough into the Dutch oven. Cover with the lid and reduce the temperature to 425°F. Bake, covered, for 40 minutes, then remove the lid and bake for an additional 5-10 minutes until golden brown. The crust should be dark golden and sound hollow when tapped.
- Remove from the oven using the parchment corners and place on a cooling rack. Let the bread cool completely for at least 2 hours before slicing. The internal temperature should reach 190-205°F. When properly cooled, the crust should be crisp and the inside should be completely set. Enjoy!
- If you loved this recipe, please leave a 5-star rating and review below!
Video
Save This Recipe 💌
Notes
- Active, bubbly starter is crucial for success. If your starter doesn't float in water, it's not ready to use.
- No proofing basket? A large bowl lined with a well-floured kitchen towel works perfectly.
- The dough will be sticky when mixing - this is normal and creates that perfect artisan texture.
- If your kitchen is cold, you may need longer fermentation times. The oven light method provides perfect warmth.
- Score the dough confidently - hesitant cuts can lead to uneven rising. A simple straight line works great for beginners.
- While bread flour is ideal, all-purpose flour can be used with good results.
- Store at room temperature in a paper bag up to 3 days. For longer storage, slice and freeze in an airtight container up to 3 months.
Nutrition
The provided nutrition information is automatically calculated. Accuracy is not guaranteed.
Did you love this recipe?
Then please leave a 5-star rating and/or review below! You can also save it! Just tap the heart symbol ❤️ in the lower right corner of your screen, and the recipe will be stored in your own recipe box!📥


Courtney says
I did the first step but my starter rose and fell before I got up in the morning would I need to feed it again or is that what you mean by ripe starter?
Jeri Walker says
Hi Courtney. I would feed it again. Ideally, you want to use it before it starts to fall. Ripe starter means that it has been fed and has at least doubled in size and is ready to use (before it falls).
Jennifer says
What if your oven doesn’t have a light inside?
Jeri Walker says
Hi Jennifer! No worries! 😊 Just let the dough rise in a warm draft-free spot instead. I've had great luck using the top of the fridge or even inside the microwave (turned off). It may take a little longer to rise in a cooler kitchen, but it will still turn out great!
Nolin says
This turned out great and was so easy! Thankful to have a great recipe to use for my discard! It was so soft and was a hit with the whole family!
Jeri Walker says
I'm so glad you liked it Nolin! 😊
Terry says
Decided to jump into baking some sourdough after talking about it for quite a while. My sister referred me to your site to start and have done a couple loaves of the no knead sourdough and have to say it turned out very good. Currently trying the WW Sourdough using the let it sit overnight in the fridge metheod and will post on the recipe once I bake it tomorrow am.
Thanks for the coaching from East Coast Canada
Jeri Walker says
Hi Terry! This comment made my day - thank you!😊 I love that your sister sent you here (please thank her for me!), and I'm so glad this recipe helped you get started with sourdough. I hope you love the whole wheat version just as much - I can't wait to hear how it turns out! I also love hearing where my readers are from! I'm actually heading out your way this summer, so your message was extra fun to read. Happy baking! 😊
Cheryl Eileen Hoeft-Gatto says
I had to put it in the frig because of an emergency that came up , it had already doubled on the counter . Will it be ok?
Jeri Walker says
Yes, it should be just fine. 😊
Amber says
Out of all of the sourdough recipes I’ve tried this is hands down the easiest and best. Sure you can spend two days folding and stretching dough but if you don’t have the time any want a no fail beautiful loaf this is your recipe! Making it tonight to go with our spaghetti dinner
Jeri Walker says
This makes me so happy to read Amber, thank you! 😊 I'm right there with you… not everyone has time for all the folding and stretching, and you can still get a beautiful loaf without it! I LOVE fresh sourdough with spaghetti! Enjoy!
Selma says
This was the first recipe I ever tried with sourdough and it was absolutely delicious!! My bread looked amazing and tasted great. My question is-can this recipe be an open bake? If so, what would need to change?
Jeri Walker says
Yay! I'm so happy your first sourdough loaf turned out so well! Yes, you can definitely bake this as an open bake instead of in a Dutch oven. The biggest thing the Dutch oven does is trap steam, which helps the bread rise and develop that crispy crust. For an open bake, place the dough on a preheated baking stone or sheet pan at the same temperature. Then add steam to the oven by putting a small pan of hot water on the bottom rack or tossing a few ice cubes into a hot pan when the bread goes in. Bake the same amount of time. The loaf may spread a little more than in a Dutch oven, but it will still taste fantastic. 😊
Rose says
does the recipe change if I use the liquid sourdough from amazon?
Jeri Walker says
Great question Rose! 😊 If it's a live liquid starter, you can feed it the night before using the same ratios in the recipe and use it once it's bubbly and active. Since it's a bit thinner, just keep an eye on your dough - you may need to add a little extra flour if it feels too sticky.
Tina says
This is the recipe I keep coming back to. It's faster and always comes out great! It works for loaf pans too.
Kara says
have you ever done inclusions with this recipe?
Jeri Walker says
Yes, this dough works really well for inclusions. 😊 I've actually published a jalapeño cheddar version and it turned out great! Check out that recipe for how to add inclusions. I add the inclusions during the shaping step so they're evenly distributed.
Shannon says
I can’t leave an accurate rating as I’ve had terrible results both times I’ve attempted this. I’ve followed the recipe exactly, made sure my starter was active and bubbly when I began. I don’t have a banneton to proof my bread in and both times when rising the second time it rose really well! The first time, it stuck like crazy to the tea towel when turned out onto the parchment paper to bake. The second time, it just fell flat after I removed it from the proofing bowl onto the parchment paper. I tried to be very careful removing it from the bowl. Can you help me troubleshoot?
Jeri Walker says
Thanks for trying the recipe Shannon and for explaining what happened. It sounds like your starter is active, which is great. If the dough stuck to the tea towel, try dusting it VERY generously with flour next time. If the dough fell flat when you turned it out, it may have proofed a little too long during the second rise. When that happens, the dough can look nicely risen in the bowl but lose structure when moved. Shortening the second rise slightly usually fixes this. You can also line the bowl with parchment instead of a towel if you don't have a banneton to make transferring the dough much easier. Hope that helps, and thank you again for giving it a try!
Diana says
I loved the way this turned out. Took the guess work out of how to be successful with sourdough! Have you tried inclusions with this recipe? if so, do you add them right before the second rise? I may do some experimenting 😉. Thank you for the great recipe!
Jeri Walker says
Hi Diana! I'm so glad it turned out for you - that's exactly what I love to hear! 😊 Yes, this dough works really well with inclusions. I like to add them during the shaping step (just before the second rise) so they get evenly distributed without knocking all the air out. I actually have a jalapeño cheddar version where I walk through exactly how to add the inclusions step-by-step - it's a great one to follow if you're trying it for the first time.
Have fun experimenting… once you start adding mix-ins, it's hard to stop! 😉