
These Old Fashioned Fluffy Air Buns are super soft, tender, and nearly melt in your mouth! They stay fresh for days and freeze exceptionally well. This is a no-fail recipe that is perfect if you are a beginner. This quick recipe makes 45 buns that are excellent for lunches and ideal for serving with burgers, soups, and stews.

Want to save this recipe?
Enter your email & I'll send it to your inbox. Plus, get great new recipes from me every week!
My all-time favorite and most used bread recipe is these air buns. This is truly the best dinner roll recipe. These buns are also known as yeast rolls, Mennonite buns, or dinner rolls, and they are so easy to make. They are the perfect addition for any special occasion like Thanksgiving dinner, Christmas dinner, and Easter dinner.
This recipe was my husband's grandma's recipe. My husband's aunt was kind enough to share this treasured family recipe with me.
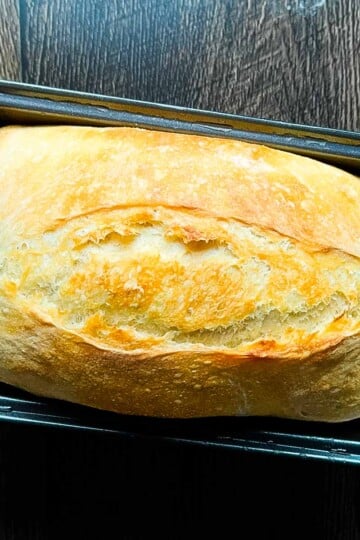
It makes three large loaves of bread or 45 air buns; one loaf of bread and 30 rolls, or two loaves of bread and 15 rolls. Anyway, you get the picture. These fresh buns are just so darn good! Plus, they never crumble and stay fresh for days! I love making a loaf of bread to use for the Ultimate Smoked Grilled Cheese Sandwich.
Jump to:
Why You'll Love This Recipe
- Light and Airy: This homemade bun recipe produces fluffy buns that are soft and airy, perfect for sandwiches or enjoying on their own.
- Easy Recipe: This no-fail homemade buns recipe is so easy even beginners will have success.
- Endless Possibilities: These fluffy buns can be used for various dishes such as veggie burgers, sliders, sandwiches, or as a side with soups or stews.
- Cost-effective: Homemade buns are more budget-friendly than store-bought hamburger buns, saving money while enjoying delicious freshly baked bread.
- No Preservatives: You can avoid artificial preservatives commonly found in store-bought buns by making buns from scratch.
- Vegan: These buns are made without animal products, making them perfect if you follow a vegan diet.
I'll certainly will use this recipe again it's very easy and the results are great!
- Victoria
Best rolls I have ever made. So light and fluffy.
- Annabelle

Ingredient Notes + Substitutions
This air buns recipe requires only a handful of simple ingredients. You probably have everything you need in your pantry already. And if not, you can get everything at your local grocery store.
- Flour. The original recipe calls for white flour, which keeps the dinner rolls nice, light, and fluffy. However, you can add up to 3 cups of whole wheat flour if you like. For the lightest, fluffiest buns, use bread flour. I do not recommend using more than 30% whole wheat flour as the buns may be too heavy and dense.
- Yeast. I use quick-rising yeast if I'm in a hurry, but any kind of yeast works well, including instant yeast.
- Sugar. Use white sugar, cane sugar, coconut sugar, raw sugar, or maple syrup.
- Oil. I use olive oil or vegetable oil, but you can use avocado oil, canola oil, or even melted vegan butter or margarine.
- Vinegar. This is the secret ingredient in these air buns. The vinegar is like a conditioner for dough; it keeps the yeast happy and helps it work better, making the buns expand.
See the printable recipe card for exact measurements and a complete list of ingredients.
Step-By-Step Instructions
These homemade air buns can be made in a KitchenAid mixer with a dough hook attachment if you have one, which saves a lot of time. However, if you don't have a stand mixer, no worries; you can mix these up by hand quite easily. Just use a wooden spoon until you can't mix it anymore, then use your hands to mix the flour.
Step 1: Mix ½ cup lukewarm water, 1 tablespoon active dry yeast, and 1 teaspoon sugar in a medium bowl. Let it sit for 5 minutes. It will start to get foamy on top.


Step 2: Add 2 cups of HOT water to the bowl of your stand mixer or large mixing bowl. Add 2 teaspoon salt and ½ cup sugar to the HOT water and stir with a spoon until it dissolves. Then add 1-½ cups warm water, ½ cup oil, 1 tablespoon vinegar, and 3 cups of flour. (If using whole wheat flour, use 3 cups of whole wheat flour,)
Start mixing with the dough hook attachment or with a wooden spoon. Add the yeast mixture and keep on mixing. Keep adding white flour gradually, a cup at a time, until you have a smooth, round ball.
The dough should just be starting to pull away from the sides of the bowl. It will still be slightly sticky, and that's okay. Continue to mix for about 5 minutes with the dough hook, or knead by hand on the countertop on a lightly floured surface.


Step 3: Cover and let rise in a warm place for 1 hour, or until the dough doubles in size. I use the 'Proof' setting on my oven, or you can turn your oven to 350°F for 1 minute, then shut it off and place your dough in there to rise. This is the first rise.


Step 4: Divide the dough into three sections. Each section will make 15 buns or one loaf of bread. Roll the dough into balls 1.5 to 2 inches in diameter. Place each dough ball on a parchment paper-lined cookie sheet for buns, or place a section into greased or parchment paper-lined bread pans for a loaf of bread.
Make the balls a bit larger if you want to make hamburger buns.
Cover and let the dough rise for 1 hour more or until doubled in size again - this is the second rise. As above, I like to place them in the oven to rise.


Step 5: Preheat your oven to 350°F. If desired, gently brush the tops of the buns with milk, melted butter, or margarine, and sprinkle sesame seeds on top.
Place buns in the oven and bake for 12-15 minutes or until golden brown. When done, take them out of the oven and place them on a wire rack to cool at room temperature.
Enjoy these fluffy buns fresh out of the oven with some margarine, Homemade Raspberry Rhubarb Jam, or Low Sugar Strawberry Jam. Yum!!! Just be careful not to burn your mouth! They also go perfectly with my Creamy Tomato Soup Recipe!

Jeri's Top Tips
- To measure the flour, use a spoon to fluff up the flour in the container, then spoon it into the measuring cup and level off with a knife. Packing the flour into the cup may lead to denser buns.
- Make sure your yeast is active by dissolving it in warm water with a pinch of sugar. The water should be around 110°F (43°C) - too hot can kill the yeast, and too cold won't activate it properly.
- When shaping the buns, divide the dough evenly so they bake uniformly. Use kitchen scales if necessary for precise measurement.
- Let the buns cool completely on a wire rack before slicing or storing. Cooling on a rack prevents them from becoming soggy on the bottom due to trapped moisture.
Storage
Refrigerator: Store leftover buns in an airtight container or sealable bag at room temperature for up to 3 days.
Freezer: For longer storage, freeze the buns and thaw them at room temperature.
Variations
The options are endless with this old-fashioned buns recipe! You can add:
- 1 cup of oatmeal; just reduce all-purpose flour by the same amount.
- Flax seeds, ⅓ cup.
- Poppy seeds, ⅓ cup
- Chia seeds, ⅓ cup
- Hemp hearts, ⅓ cup
- Dip the top of the buns in grated cheese before baking for homemade cheese buns.
Recipe FAQs
Yes, you can over-knead the dough, which may cause the buns to be hard on the outside and dry on the inside.
Certainly! Feel free to customize your homemade buns by adding toppings like sesame seeds, poppy seeds, coarse salt, or herbs like rosemary or thyme.
There could be multiple reasons why your dough isn't rising properly. It could be due to inactive yeast, water that was too hot or too cold while activating yeast, lack of warmth during rising, or expired yeast. Ensure your yeast is fresh and active, and follow the recipe instructions carefully.
Absolutely! Divide the dough into smaller portions and adjust the baking time accordingly. Mini buns will bake faster than regular-sized ones, so keep a close eye on them to prevent over-browning.


If you like this post on this Old Fashioned Air Buns recipe, please take a moment to rate the recipe 🌟🌟🌟🌟🌟 and leave a comment below with your thoughts!
Printable Recipe

Old Fashioned Fluffy Air Buns
Ingredients
Yeast mixture
- ½ cup lukewarm water
- 1 tablespoon yeast
- 1 teaspoon sugar
How to make the dough
- 2 cups HOT water
- 2 teaspoon salt
- ½ cup sugar
- 1½ cups WARM water
- ½ cup oil
- 1 tablespoon white vinegar
- 7-8 cups all-purpose flour, unbleached (or more as needed until the dough forms a soft, smooth ball)
Instructions
Yeast mixture
- Mix ½ cup lukewarm water, 1 tablespoon yeast, and 1 teaspoon sugar in a small bowl. Let it stand for 5 minutes. It will start to get foamy on top.
Make the dough
- Add 2 cups of HOT water to a large bowl or stand mixer.
- Add 2 teaspoon salt and ½ cup sugar to the hot water and mix until it dissolves.
- Next, add 1½ cups WARM water, ½ cup oil, 1 tablespoon vinegar, and 3 cups of flour. Mix.
- Add the yeast mixture to the bowl and keep mixing.
- Keep adding flour gradually, one cup at a time, until the dough is smooth and begins to pull away from the sides of the bowl. If the dough still looks too wet, continue adding flour ½ cup at a time until a soft, smooth ball forms.
- Continue punching down for 8 to 10 minutes, or 5 minutes with a stand mixer with the dough hook.
- Cover and let rise in a warm place for 1 hour, or until the dough doubles in size.
- Divide the dough into 3 equal sections. Each section will make 15 buns. To shape the buns, roll out the dough into 1.5 to 2-inch balls. Place dough balls on cookie sheets covered with parchment paper.
- Cover and let rise in a warm place for 1 hour, or until doubled in size.
When buns are as big as you want them:
- Preheat oven to 350 degrees F.
- Place buns in the oven and bake for 12-15 minutes or until golden brown.
- Remove from the oven and place on a wire rack to cool.
Save This Recipe 💌
Notes
- Proof the yeast: Always proof your yeast before using it in the recipe. This step ensures that the yeast is active and will result in a successful rise. If the yeast fails to become foamy during proofing, discard it and use fresh yeast.
- Flour amounts vary: Different flours absorb liquid differently, so you may need up to 9-10 cups total, depending on humidity and flour brand.
- Let it rise: During the first and second rise, allow the dough to double in size. To create an ideal environment for rising, place the covered dough in a warm area. This can be done in the oven on the 'Proof' setting, which creates the perfect environment, or preheating your oven at 350 degrees F for 1 minute, then shutting it off. The residual heat will create a warm environment for your dough to rise in.
- Baking: Keep a close eye on the buns when baking to avoid over-browning. Once baked, transfer the buns to a wire rack to cool. This helps maintain their texture and prevents them from becoming soggy.
- Freezing: If you have leftover buns or want to prepare them in advance, they freeze well. Let the buns cool completely before placing them in a Ziplock freezer bag. When ready to enjoy, defrost the buns at room temperature for a few hours.
Nutrition
The provided nutrition information is automatically calculated. Accuracy is not guaranteed.


Diane Burrows says
WAY TOO MUCH LIQUID! I ended up throwing it all in the trash! What a waste of ingredients! So disappointing. Thank God I decided to make them a few days ahead of Thanksgiving!
Jeri Walker says
Oh no! I'm so sorry this happened right before a major holiday - that's the last thing I want! I make this recipe nearly every week, and the dough does start out very soft and wet, but it should come together as you add the flour, a little at a time. Since different brands of flour absorb liquid differently (and humidity can be a pain too), some batches need closer to the full 8 cups, and occasionally up to 10, before a smooth ball of dough forms. The easiest way to fix it, if the dough seems too wet, is to just keep adding flour, ½ cup at a time, until it pulls together. I'll also be adding a step-by-step video to the post soon so you can see what the dough should look like at each stage. Thanks for your feedback. If you'd like to try it again, I'm more than happy to help troubleshoot with you.
Victoria says
Just made this recipe and cut it in half as I didn't need so many buns.
I made 13 buns and a loaf of bread. I'll certainly will use this recipe again it's very easy and the results are great!
Jeri Walker says
Aww, that makes me so happy to hear Victoria! I love that you made both buns and a loaf of bread - and that a half batch worked out perfectly! Thank you for taking the time to come back and leave a comment! ❤️
MJ says
Mixed by hand, super wet and must have used at least 9.5 cups of flour as well. Finally got to a reasonable consistency and raising now. Not quite a true ball, so sure hope they turn out as great as the pictures! How long do you bake a loaf of bread vs. the buns? Thanks!
Jeri Walker says
I bake a loaf of bread for about 25 minutes at 350F. I hope you like it! 🙂
MJ says
Thanks Jeri! l have 12 very sticky large buns and 1 round loaf of bread on the 2nd rise now. 😃 Definitely will try stand mixer next time, not sure l have bread hook, but mechanical mixing has to help for this recipe where the dough is so expansive...and l only used an envelope of yeast which is little less than a Tablespoon.
Annabelle Hersel Hersel says
Best rolls I have ever made. So light and fluffy. I needed a lot more flour more like 9 1/2 cups. Seems to have a lot of water 4 cups in all. The results was fantastic. Thank you so much for the recipe. I made a large loaf and twenty large rolls.
Isabelle morhart says
I am just making the buns the dough is really sticky and I used a lot more flour in order to form the buns is it possible to use flour to form the buns
Jeri Walker says
Hi Isabelle. How much flour did you use? Are you using a stand mixer or mixing by hand? It is okay if the dough is a bit tacky, you just want it to pull away from the sides of the bowl if using a stand mixer, and it should form into a round ball before the first rise. If it is sticking to your fingers too much, add a tiny bit of flour, a little bit at a time, until you are able to knead it into a round ball.
Lili says
I wonder if the dough can be made the night before and let it sit in the fridge overnight? Do you think it might work?
Jeri Walker says
Hi Lili! Yes, you can make the dough and put it in the refrigerator overnight. Once the dough is made, cover it and place it in the fridge overnight. The next morning, form it into buns or bread and let it rise in a warm place until it doubles in size, then bake as directed. I hope this helps! 🙂
Lili says
Done and in the fridge. Lets hope it doesnt over proof overnight.
Jessica says
The rolls are perfectly fluffy!! They were great straight outta the oven smothered in butter and just as good for sandwiches the next day. Will be making them again for Thanksgiving. Thanks!
Jeri says
I'm so glad you liked the Jessica!
Megan Ellam says
These look fabulous! I have bookmarked for later and pinned. Thanks for sharing.
Andrea White says
big bread fan over here! these are absolutely fantastic!
Tara says
This is the ONLY recipe we need. Just started making our own bread a month ago, trying different recipes till we found something we loved. This is the best of every biscuit and bread recipe we tried!
Jeri Walker says
Yay! I'm so glad you love the recipe as much as I do! 😀