
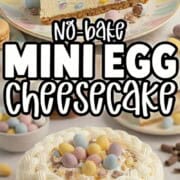

My easy No-Bake Mini Egg Cheesecake is a creamy, chocolate-loaded Easter dessert made with Cadbury's mini eggs and a buttery biscuit base - no oven required. It's simple to make, perfect for making ahead, and always one of the first desserts gone.

Want to save this recipe?
Enter your email & I'll send it to your inbox. Plus, get great new recipes from me every week!
Looking for another fun Easter dessert? Make my Mini Egg Cookies, Mini Egg Brownies, or this Easter Bunny Cake.
I've tested this recipe several times to make sure the cheesecake filling sets properly without gelatin and slices clean every time.

Easy No-Bake Easter Cheesecake (No Oven Required)
In my never-ending quest to keep holiday desserts simple but still worth making, no-bake cheesecakes have become a go-to in my kitchen, especially in April when oven space is already tight.
This mini egg version checks all the boxes. The cheesecake filling is smooth and creamy, the buttery biscuit base holds together beautifully, and those crunchy chocolate pieces add just the right amount of texture in every bite.
I usually make this the night before Easter dinner so it has plenty of time to set. By the time dessert rolls around, it slices clean with a knife and looks like you spent way more time on it than you actually did.
And if you're already planning your Easter menu, this pairs perfectly with Double Smoked Ham or Pellet Smoked Turkey, Oven-Roasted Potatoes, Carrot Salad, and Fluffy Air Buns.
Jump to:
Recipe Ingredients
All ingredients are shown in the photo below, with a few helpful notes to guide you.

- Graham cracker crumbs. Buy the crumbs in a box, or make your own from graham cracker sheets, to create the classic buttery biscuit base. If you don't have graham cracker crumbs, you can use crushed gingersnaps, crushed vanilla wafers, or digestive biscuits. Use a food processor to crush them, or place the crackers in a large Ziploc bag and use a rolling pin to crush them.
- Butter, melted. I used unsalted butter. This binds the crust together.
- Cream cheese, softened. I use full-fat cream cheese for the best texture. You can also use mascarpone cheese.
- Heavy whipping cream. I used heavy cream (35% MF). This is also known as double cream, depending on where in the world you live. This acts as your stabilizer and helps the cheesecake set without gelatin. You can also use Cool Whip instead.
- Sugar. I used granulated sugar.
- Lemon juice. This gives a fresh taste and helps the sugar to dissolve.
- Vanilla extract. I used pure vanilla extract.
- Icing sugar or powdered sugar.
- Cadbury's mini eggs. Roughly chopped for crunch (plus extra mini eggs for topping). You can also use mini chocolate chips, M&Ms, or chocolate chunks.
See the printable recipe card at the bottom of the post for a complete list of ingredients and quantities.
How to make No-Bake Mini Egg Cheesecake
Melt the butter in the microwave or on the stovetop, then mix it with the graham cracker crumbs until evenly coated.
Press the mixture firmly into a 9-inch springform pan, making sure to really compact it so the base holds together when sliced. Place the pan in the fridge to chill while you prepare the filling.


Place the mini eggs in a sealed bag and gently crush them with a rolling pin. You want small chunks, not fine crumbs - this is what gives the cheesecake that signature crunch. Set aside about ¼ cup for topping later.
In a large bowl, whip the heavy cream until stiff peaks form. This step is key, as it helps the cheesecake filling set properly. The cream should hold its shape when you lift the beaters - that's when it's ready.
In a separate bowl, beat the cream cheese until smooth, then add the sugar and lemon juice. Scrape down the sides of the bowl to keep the mixture lump-free.
Fold the whipped cream into the cream cheese mixture until light and fluffy, then gently fold in the chopped mini eggs.

Spread the cheesecake filling evenly over the chilled crust, smoothing the top with a spatula.


In another bowl, whip the remaining cream with icing sugar and vanilla until thick. Spread this over the cheesecake, then sprinkle the reserved mini eggs over the top for decoration.


Refrigerate for at least 4 hours, though overnight will give you the best texture. Before removing the cheesecake from the pan, run a knife around the sides of the pan to keep the edges clean. Slice with a sharp knife, wiping between cuts for neat slices.

Jeri's Top Tips
- Whip the cream properly: Stiff peaks are what stabilize the cheesecake filling.
- Use room temperature cream cheese: This prevents lumps.
- Chill long enough: This is what gives you clean slices.
- Use a sharp knife: Wipe between cuts for neat edges.
- Press the crust firmly: A loose base will crumble when slicing.
Variations
- Make a chocolate crust instead of a graham cracker crust.
- Use different types of mini Easter eggs, such as Reese's peanut butter-filled mini eggs, Cadbury creme eggs, or caramel-filled eggs.
- Make this cheesecake in a big hollow chocolate easter egg. Skip the graham crust, split a chocolate egg in half, and spoon the cheesecake mixture inside. Top with a whipped cream layer and candy eggs for a fun treat!
- Add fruit on top, such as strawberries or blueberries.
- Drizzle melted chocolate or chocolate sauce on top.
Storage
Refrigerator: Store this Easter egg cheesecake, covered with plastic wrap or in an airtight container, for up to 3 days in the fridge.
Freeze: Wrap the cheesecake in plastic wrap, then place it in a Ziploc freezer bag. Freeze for up to 2 months. To serve, place it in the refrigerator to thaw.

Recipe FAQs
Your cheesecake might be runny if the whipping cream wasn't whipped until stiff peaks form, or if it didn't chill long enough. You can place it in the freezer for 1-2 hours to help it firm up.
This recipe makes about 8-10 slices.
You'll need about 9-10 sheets (1 sleeve) to make 1½ cups of crumbs.

More Easy Dessert Recipes
Here are a few reader favorites to try next:
Did you make this No-Bake Mini Egg Cheesecake? Please RATE THE RECIPE 🌟 below! Thank you! 😊
Printable Recipe

No-Bake Mini Egg Cheesecake
Ingredients
Crust
- 1½ cups graham cracker crumbs
- ½ cup melted butter or margarine
Filling
- 1 cup heavy whipping cream
- ½ teaspoon vanilla extract
- 8 oz cream cheese softened
- 1 cup granulated sugar
- 1 tablespoon lemon juice
- 1½ cups chopped mini eggs divided
Topping
- 1 cup heavy whipping cream
- 2 tablespoons icing sugar
- ½ teaspoon vanilla extract
Instructions
- Combine the graham cracker crumbs with the melted butter until evenly coated, then press the mixture firmly into a 9-inch springform pan. Chill the crust in the fridge while you prepare the filling.
- Place the mini eggs in a sealed bag and gently crush them into small chunks, reserving some for topping.
- In a large bowl, whip the heavy cream until stiff peaks form. In a separate bowl, beat the cream cheese with the sugar and lemon juice until smooth and creamy.
- Fold the whipped cream into the cream cheese mixture until light and fluffy, then fold in the crushed mini eggs. Spread the cheesecake filling evenly over the chilled crust.
- Whip the topping ingredients (1 cup heavy cream, 2 tablespoon icing sugar, and ½ teaspoon vanilla extract) until thick, then spread over the cheesecake and sprinkle with the reserved mini eggs.
- Refrigerate for at least 4 hours, or overnight for best results. Before serving, run a knife around the edges of the pan, slice, and serve.
Save This Recipe 💌
Notes
- Cream cheese. Use full-fat cream cheese and make sure it's at room temperature before mixing. This helps create a smooth cheesecake filling without lumps.
- Whipping cream. The cream must be whipped to stiff peaks so the cheesecake sets properly. When you lift the beaters, the cream should hold its shape - this acts as your stabilizer without needing gelatin.
- Mini eggs. Don't crush them too finely. Small chunks give the best texture and a bit of crunch in every bite. Save a few extra mini eggs for topping.
- Chill time. This cheesecake needs at least 4 hours to set, but overnight is best for clean slices and firm edges.
- Slicing. Use a sharp knife and wipe it clean between cuts for neat slices. Running a knife around the sides of the pan before removing helps keep the edges of the cheesecake smooth.
- Make ahead. This is a great make-ahead dessert, and actually tastes better the next day once fully set.
- Storage. Store covered in the fridge for up to 3 days, or freeze for up to 2 months and thaw overnight in the refrigerator.
Nutrition
The provided nutrition information is automatically calculated. Accuracy is not guaranteed.
Did you love this recipe?
Then please leave a 5-star rating and/or review below! You can also save it! Just tap the heart symbol ❤️ in the lower right corner of your screen, and the recipe will be stored in your own recipe box!📥
Rod & Mary Ell says
Most delicious recipe ever tasted