


This easy 2-Ingredient Chocolate Fudge using Frosting is the perfect treat for any holiday or special occasion. Using ready-made frosting and chocolate chips, you can whip up a batch of delicious fudge in minutes!
If you love this recipe, try my 2 Ingredient Peanut Butter Fudge Recipe or Christmas Fudge next!

Want to save this recipe?
Enter your email & I'll send it to your inbox. Plus, get great new recipes from me every week!
This two-ingredient fudge recipe is for all you chocolate lovers out there! You won't believe how quick and easy it is to whip up a batch of this dreamy, double chocolate fudge!
This no-fail recipe comes together in just a few minutes using ready-made frosting and chocolate chips. Plus, no candy thermometer is required!
Despite the shortcut ingredients, this smooth fudge has a texture similar to traditional fudge. As it cools, the melted chocolate and frosting firm up into a rich, creamy square that melts in your mouth.
Make a batch of this chocolate for Easter, Mother's Day, Father's Day, or Christmas! Any time of year!
Jump to:
💗 Why You'll Love This Fudge
- It's incredibly easy to make with just two ingredients you likely already have!
- You can customize this fudge by using different types of frosting or baking chips, creating many flavor variations.
- It has a texture similar to traditional fudge despite the shortcut ingredients.
- It's perfect for gifting, parties, or enjoying at home.
- It can be made ahead of time and stored in the fridge for up to two weeks.
🍫 Ingredients
Only two simple ingredients are needed to make this easy fudge recipe.

- Chocolate frosting. Rich chocolate frosting is ideal. Use frosting made primarily from chocolate, not just chocolate-flavored. You could also change the flavor by using cream cheese frosting.
- Chocolate chips. All you need is a bag of chocolate chips. Semi-sweet chocolate chips or dark chocolate chips work best. Higher cocoa percentage chips will give you a more intense chocolate flavor. Premium chocolate chips are worth the extra cost here since chocolate is one of only two ingredients. You could also change the flavor by using white chocolate chips or peanut butter chips.
See the printable recipe card for exact measurements and a full list of ingredients.
🥣 Instructions
First, line an 8x8 inch square baking pan with parchment paper or aluminum foil, leaving some so it overhangs on the sides. This will make it easier to remove the fudge from the pan later. As I did, you can also grease the pan liberally with butter, margarine, or non-stick cooking spray.
Place chocolate chips in a medium saucepan and heat on medium-low heat until melted and smooth.


Add the entire can of frosting to the melted chocolate and whisk until well combined. The mixture will be thick and glossy.
Tip: You can also use a microwave to melt the chocolate chips. Place them in a microwave-safe bowl, and melt the chocolate chips in 30-second increments, stirring between intervals until the chocolate is completely melted and smooth. Be careful not to overheat the chocolate as it can burn easily.


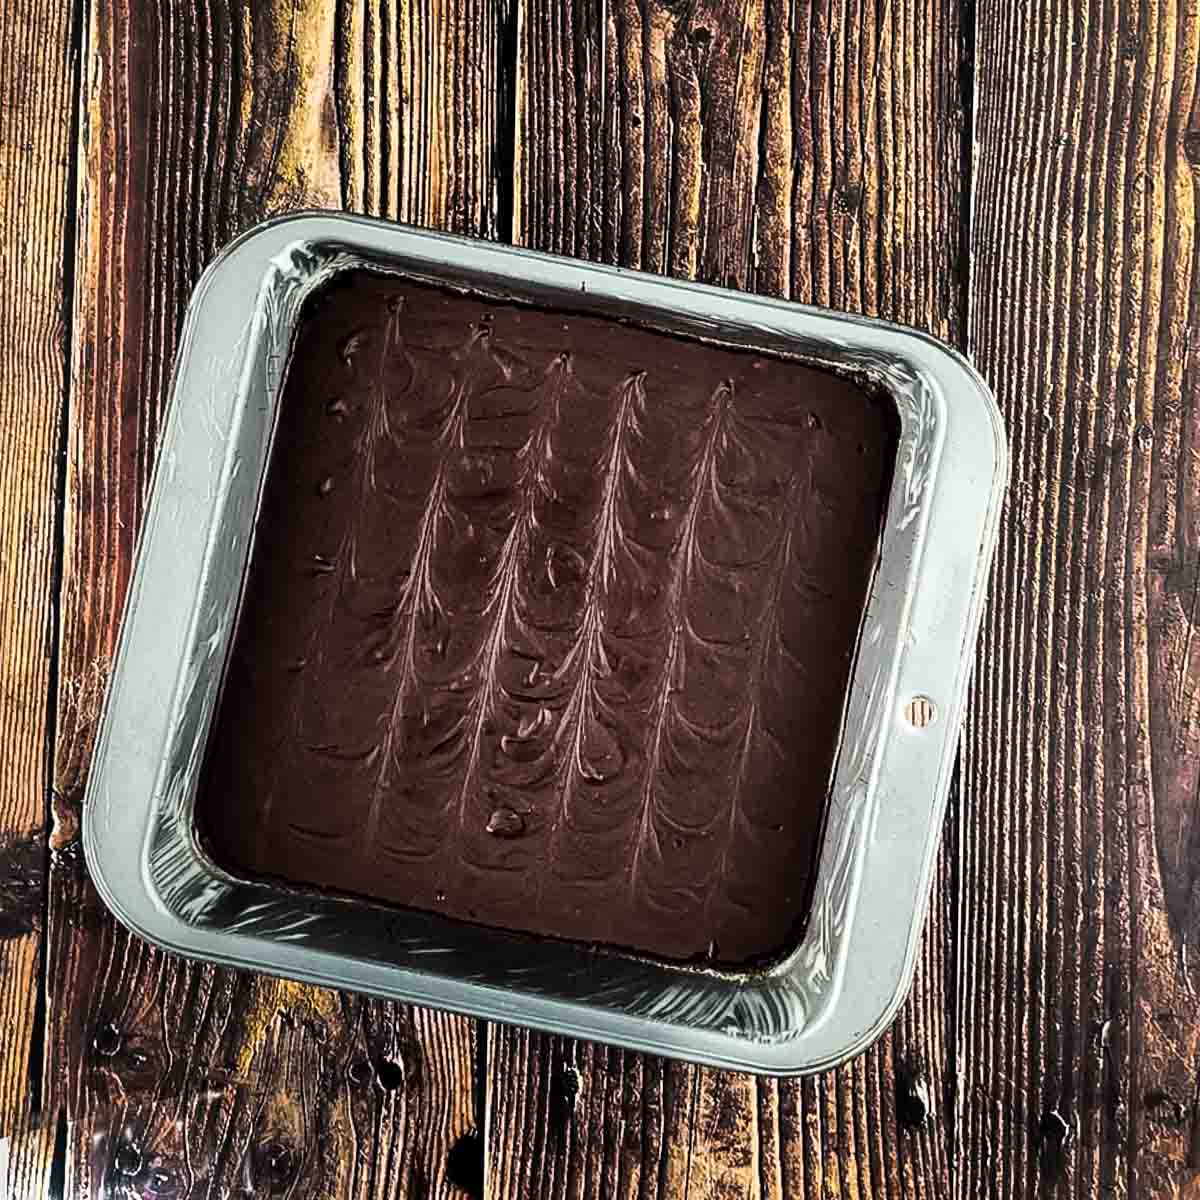
Immediately pour the mixture into the prepared pan, spreading it out evenly with a spatula.


Place the pan in the refrigerator for at least 2 hours or until the fudge is firm and set.
Once the fudge has set, use the overhang on the parchment paper or aluminum foil to lift the fudge out of the baking dish.

Cut the fudge into small squares and serve. That's it! Enjoy!

Top Tips
- When melting the chocolate chips in the microwave or stove, stir the chocolate in 30-second intervals to prevent scorching or burning.
- Use parchment paper or grease the pan with butter before pouring in the fudge mixture to easily lift the fudge from the pan in one piece.
- Refrigerate the fudge mixture for at least two hours or until it is firm before slicing and serving. This will prevent the fudge from being too soft and difficult to cut cleanly.
- Use a sharp knife dipped in hot water when slicing the fudge to help it easily glide through it.
- After slicing the fudge, store it in an airtight container in the refrigerator for up to 2 weeks.
🥜 Variations
- Add-ins: You can add different types of nuts, dried fruits, candy pieces, or crushed cookies to the fudge mixture to give it some extra flavor. Just fold them into the fudge mixture before pouring it into the pan.
- Flavor extracts: You can add a few drops of your favorite flavor extract. Try mint extract for mint chocolate fudge, almond extract for a nutty flavor, or orange extract for an orange chocolate flavor.
- Icing flavors: You can use different flavors of icing to make different types of fudge. For example, use vanilla frosting and white chocolate chips for white chocolate fudge, chocolate icing and peanut butter chips for chocolate-peanut butter fudge, or strawberry frosting and white chocolate chips for strawberry fudge.
- Toppings: You can top the fudge with different types of toppings before it sets. Crushed candy canes, chopped nuts, or sprinkles are great options.
- M&M's: You can add M&M's to the fudge mixture before pouring it into the pan or sprinkle them on top before cooling.
- Swirled fudge: You can make marbled or swirled fudge using two flavors of icing or chocolate chips. Melt each type of chocolate in separate bowls and swirl them together in the pan before allowing the fudge to set.
- Salted caramel: You can add a drizzle of caramel sauce and a sprinkle of sea salt to the top of the fudge before it sets for a sweet and salty treat.
🧾 Recipe FAQs
Yes, you can use any type of frosting you like, such as vanilla, chocolate, or cream cheese. Keep in mind that different kinds of frosting will produce different flavors.
Stored in an airtight container in the fridge, the fudge will stay fresh for up to 2 weeks. It can also be stored in the freezer for up to 3 months.
The fudge needs to set for at least 2 hours in the refrigerator before slicing and serving.
Store the leftover fudge in an airtight container in the refrigerator for up to 2 weeks.
Yes, you can freeze the fudge for up to 3 months. Wrap it tightly in plastic wrap and then in foil, or place it in an airtight container before freezing. Allow it to thaw in the refrigerator before serving.
Yes, you can double the recipe to make a larger batch of fudge. Just make sure to use a larger pan or two 8x8-inch pans.

👩🏻🍳 More Easy Desserts You'll Love


If you like this post on this easy 2 Ingredient Chocolate Frosting Fudge recipe, please take a moment to rate the recipe 🌟🌟🌟🌟🌟 and leave a comment below!
Printable Recipe

Two-Ingredient Chocolate Fudge
Ingredients
- 1 can chocolate frosting, room temperature 16 oz or 453 g (450 g in Canada)
- 2 cups semi-sweet chocolate chips 12 oz or 300 g (1 bag)
- Optional Toppings: chopped nuts, flaky sea salt, sprinkles, or crushed candy
Instructions
- Line an 8x8 inch square baking pan with parchment paper or aluminum foil, leaving a 2-inch overhang on all sides for easy removal. If using foil instead, lightly grease with butter to prevent sticking.
- Place chocolate chips in a medium saucepan over medium-low heat. Stir constantly until completely melted and smooth, about 3-4 minutes. Alternatively, microwave in 30-second intervals at 50% power, stirring between each, until fully melted (typically 2-3 intervals).
- Add the entire container of room-temperature frosting to the melted chocolate. Whisk thoroughly until mixture is completely combined and glossy, about 1-2 minutes. The mixture should be thick but spreadable.
- Pour the warm fudge mixture immediately into the prepared pan. Using an offset spatula, spread evenly into corners and smooth the top. Add any optional toppings now.
- Refrigerate uncovered for at least 2 hours or until completely firm when gently pressed. For best results, chill overnight.
- Once set, use the parchment overhang to lift the fudge from the pan. Cut it into small squares using a knife warmed under hot water and dried between cuts.
- Serve immediately or store according to the instructions below. Enjoy!
Save This Recipe 💌
Notes
- Premium chocolate chips make a difference - they melt better and taste richer.
- Room temperature frosting incorporates more smoothly than cold.
- Don't overheat the chocolate, or it may seize.
- A sharp, warm knife makes the cleanest cuts.
- Store-bought frosting works better than homemade for this recipe.
- Leftovers keep beautifully in the fridge for up to 2 weeks or frozen for 3 months.
Nutrition
The provided nutrition information is automatically calculated. Accuracy is not guaranteed.


Charlie White says
This is the best and easiest Recipe I've tried so fat, Rich and creamy with the chocolate frosting. The same with Peanut Butter one and that came out beautiful. Thanks for sharing that.
Jeri Walker says
That made my day Charlie, thank you so much! And I'm so glad you loved both versions! The chocolate frosting is definitely a favorite around here too. I really appreciate you taking the time to come back to leave a rating and review! ❤️
Charlie White says
Hi Again, I am making my second batch of chocolate fudge tomorrow. We just finished the second batch of the Peanut Butter one. Damn it's good. :o) :o).